Woodcraft, bush craft, camp craft… whatever term you prefer, is all about building skills of self-reliance.
Editor's Choice
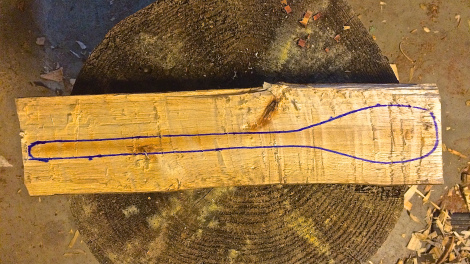
Spoon Carving with an Ax

Woodcraft, bush craft, camp craft… whatever term you prefer, is all about building skills of self-reliance. You may keep a titanium spork or cheap plastic spoon in your camp kit, but nothing compares to eating a bowl of squirrel soup from a wooden utensil you carved from a hunk of tree!
Over the holidays, I discovered that Dirt Road Girl and my mama are very fond of a particular wooden cooking utensil. It is more of a spatula than a spoon and their favorite for stirring chili and soups. You’ve got a favorite cooking spoon, right? Well, this design can’t be found in stores any longer. They’ve looked!
Tag. I’m it. I told them I’d carve one.
It’s pretty simple. You remove the wood that is not a spoon and… bam! … you’re slurping soup by the campfire.
Spoon Carving 101
To get started, you need only a few basic tools. You can buy expensive carving knives, but a sharp, thin-bladed, inexpensive knife will work just fine. One specialty knife you’ll want to acquire is a crooked knife. A wood gouge also works. Most self-reliant types own a short-handled hatchet or ax. A small folding saw will save you loads of frustration.
Basic Tools List
- Hatchet/ax – short-handled and sharp
- Knife for detail work – I used my Mora Companion
- Crooked/hook knife – Mora brands are inexpensive and great little cutting tools
- Saw – small folding saws on Leatherman tools, Swiss Army Knives, or camp saws work well
- Pencil or marker for outlining your design
- Wooden anvil or platform
- Wooden maul to baton round wood into carving blanks
What Wood Works?
There are many wood sources for carving blanks. I built a fence for a neighbor this summer and trimmed a 3 inch maple limb clearing the fence line. Tossed it in my wood pile for a future unnamed project. Glad I did. Also, storm damage yields excellent pickings as well! Your neighbor will be glad to have you “clean” up their dropped limbs.
Maple has a very tight grain and works well for carving, especially the ladle indention. For this project, I wanted to try sycamore. It is more grainy and twisted than maple. But we have a field full of young sycamores in the bottom of our land.
Some in the woodcraft/Bushcraft community view Sycamore as a trash tree. It’s actually a great tree for survival and self-reliance… beyond woodworking! But we’re carving spoons today. Here’s a few facts you might want to know about this distinctive wood…
Sycamore Woodworking Profile
- Sycamore is grown commercially for pulp and rough lumber.
- Interlocking grain makes nice accent pieces for woodworking.
- Turns easily on a lathe for bowls.
- Beautiful specking on gun stocks.
- Music boxes; guitars and violins.
- Hard to split which makes sycamore an excellent butcher’s block.
- Quarter sawn makes this wood more stable for projects. Flat sawn tends to warp.
- It gets one of its nicknames “Buttonwood” from it ability to create durable wooden buttons.
- The wood is food safe and was used for food crates and barrels in the past.
Note: Do your due diligence to ensure your wood selection is safe for cooking and eating purposes.
Watch our tutorial video at the end of this post for the finer points of spoon carving.
Safety and Grips
Here are few whittling grips and techniques that are helpful and safe:
- Overhand Grip ~ Hold the knife in your hand like a tennis racket. The spine of the knife should be facing away from your body and in line with the V formed between your thumb and index finger. It’s like you’re shaking hands with your knife handle.
- Chest Lever ~ Grip the knife in the opposite manner of the overhand grip. The cutting edge will be facing the V between your thumb and index finger. Holding the wood with your off-hand, bring the knife and wood towards your chest making a scissor pattern. With the cutting-edge on the wood anchored in your chest area, contract your back and shoulder muscles to remove wood in a power, yet controlled manner.
- Thumb Lever ~ Place your off-hand thumb on the spine of the knife in an overhand grip and push the blade with your thumb for better precision cuts. You can also use your thumb as a fulcrum by rotating your knife spine against your thumb for sweeping cuts.
- Knee Lever ~ With an overhand grip, brace the inside of your wrist against the outside edge of you knee. Pull the wood towards your body making contact with the anchored cutting edge. This controlled motion, performed properly, produces fine curls and shavings.
- Gloves ~ For beginners or even seasoned whittlers, a leather glove on your off-hand may prevent a bloody mess on your spoon.
- Keep it Horizontal ~ Your ax has less of a chance of biting you if it strikes the wood with the handle horizontal. Increase this angle at contact and you increase your chances of burying the hatchet… in your anatomy.
- Avoid the Triangle of Death (the triangle formed between you knees and crotch). Nick a femoral artery and your spoon carving days are over.
- Alone in the Blood Circle ~ If you have onlookers admiring your whittling abilities, be sure they are outside your Blood Circle. To define your circle, spin in a circle with your outstretched arm, cutting tool in hand. The area inside this circumference and just beyond is your blood circle. You’re the only person allowed in this area.
Wooden Spoon Care
- Not dishwasher safe – hand wash and dry
- Keep ‘em lubed
Once you’ve completed your spoon, you want to make it last. To do this, the wood needs to be sealed.
Note: Green, non-seasoned wood spoons have to be dried before sealing. Place them in a paper bag for 5 or 6 days to allow them to dry slowly. Humidity will determine how fast they dry. Another method I hear works is to place completed “green” spoons in a sealed plastic bag. Check them every day or so for moisture build up inside the bag. Wipe the moisture off and re-seal until the wood stops releasing moisture.
Choose Your Sealant
Vegetable oils can turn rancid over time. Mineral oil is petroleum-based… “they” say it’s safe to ingest. I’ve read, haven’t tried it yet… too expensive, that walnut oil is great for sealing wooden eating/cooking utensils. Yep, it’s a nut oil that supposedly will polymerize to form a hard covering that prevents the oil from turning rancid.
I’ll stick with my homemade Fixin’ Wax recipe. Heat up slightly and rub liberally on the wood surface.
Now for the video:
I’ve had offers to buy my spoons. It’s a hobby for now but could turn into a cottage business if one wished to hone this skill. They make great gifts for ladies and men alike. Plus, food just tastes better from a wooden spoon you crafted with your own hands!
Keep Doing the Stuff of Self-Reliance,
Todd
Resources:
The Prepper’s Blueprint: The Step-By-Step Guide To Help You Through Any Disaster
The Pantry Primer: How to Build a One-Year Food Supply in Three Months
Delivered by The Daily Sheeple
We encourage you to share and republish our reports, analyses, breaking news and videos (Click for details).
Contributed by Todd Walker of Survival Sherpa.
Todd Walker is married to the lovely Dirt Road Girl, proud father and grandfather, a government school teacher, a lover of the primal lifestyle and liberty. You can check out his website at Survival Sherpa with a vision of helping each other on the climb to self-reliance and preparedness…the Survival Sherpa way…One step at a time. Follow him on Twitter. Send him mail: [email protected]